Metal stamping is a manufacturing process used to convert flat metal sheets into specific shapes. It is a complex process that can include a number of metals forming techniques – blanking, punching, bending and piercing.
“Advanced technology, In line with the advanced level in the world.”
There are thousands of companies across the China that offer metal stamping services to deliver components for industries in automotive, aerospace, medical, and other markets. As global markets evolve, there is an escalated need for quickly-produced large quantities of complex parts.
Metal stamping is a fast and cost-effective solution for this large-quantity manufacturing need. Manufacturers who need metal parts stamped for a project generally look for three important qualities:
- High quality & durability
- Low Cost
- Fast Turnaround Time
The following guide illustrates best practices and formulas commonly employed in the metal stamping design process and includes tips to incorporate cost cutting considerations into parts.
Stamping Basics
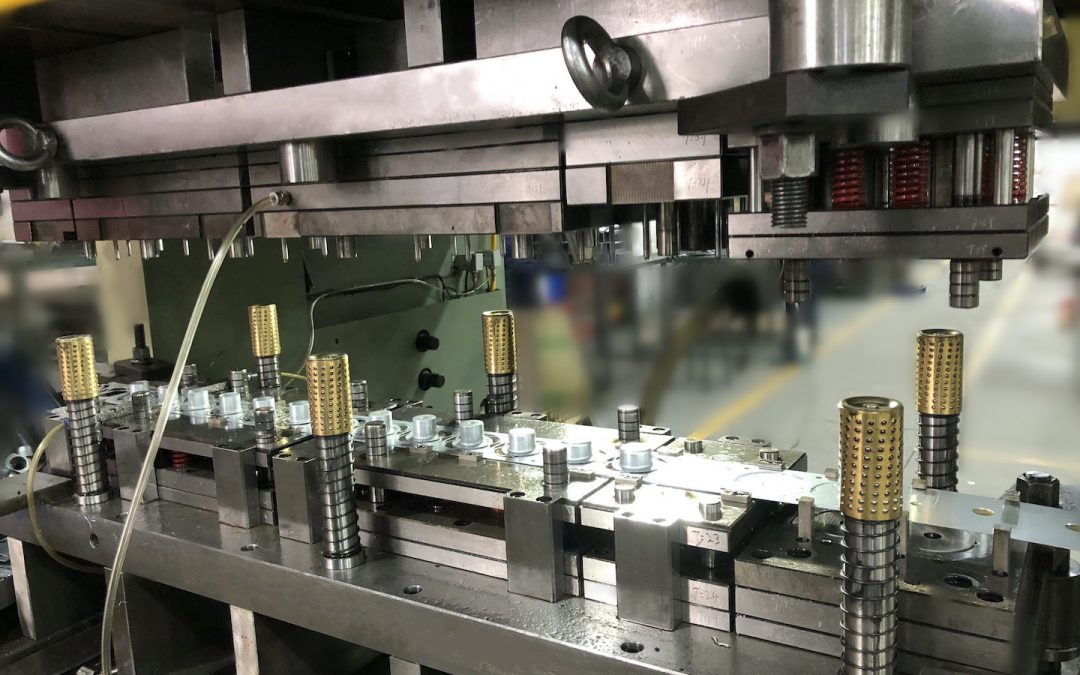
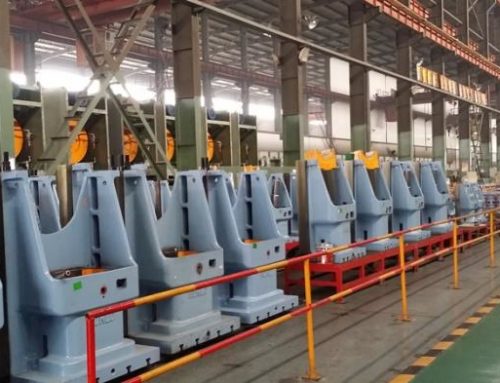
Stamping — also called pressing — involves placing flat sheet metal, in either coil or blank form, into a stamping press. In the press, a tool and die surface form the metal into the desired shape. Punching, blanking, bending, coining, embossing, and flanging are all stamping techniques used to shape the metal.
Before the material can be formed, stamping professionals must design the tooling via CAD/CAM engineering technology. These designs must be as precise as possible to ensure each punch and bend maintains proper clearance and, therefore, optimal part quality. A single tool 3D model can contain hundreds of parts, so the design process is often quite complex and time-consuming.
Once the tool’s design is established, a manufacturer can use a variety of machining, grinding, wire EDM and other manufacturing services to complete its production.
ProfesTypes of Metal Stamping
There are three major types of metal stamping techniques: progressive, four slide and deep draw.
Progressive Die Stamping
Progressive die stamping features a number of stations, each with a unique function.
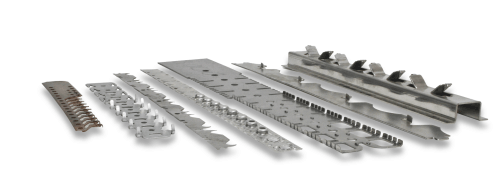
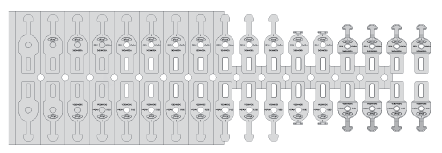
First, strip metal is feds through a progressive stamping press. The strip unrolls steadily from a coil and into the die press, where each station in the tool then performs a different cut, punch, or bend. The actions of each successive station add onto the work of the previous stations, resulting in a completed part.
A manufacturer might have to repeatedly change the tool on a single press or occupy a number of presses, each performing one action required for a completed part. Even using multiple presses, secondary machining services were often required to truly complete a part. For that reason, progressive die stamping is the ideal solution for metal parts with complex geometry to meet:
- Faster turnaround
- Lower labor cost
- Shorter run length
- Higher repeatability
Four slide Stamping
Four slide, or multi-slide, involves horizontal alignment and four different slides; in other words, four tools are used simultaneously to shape the workpiece. This process allows for intricate cuts and complex bends to develop even the most complex parts.
Four slide metal stamping can offer several advantages over traditional press stamping that make it an ideal choice for many applications. Some of these advantages include:
- Versatility for more complex parts
- More flexibility for design changes
As its name implies, a four slide has four slides — meaning that up to four different tools, one per slide, can be used to achieve multiple bends simultaneously. As material feeds into a four slide, it is bent in quick succession by each shaft that is equipped with a tool.
Deep Draw Stamping
Deep drawing involves pulling a sheet metal blank into the die via a punch, forming it into a shape. The method is referred to as “deep drawing” when the depth of the drawn part exceeds its diameter. This type of forming is ideal for creating components that need several series of diameters and is a cost-effective alternative to turning processes, which typically require using up more raw materials. Common applications and products made from deep drawing include:
- Automotive components
- Aircraft parts
- Electronic relays
- Utensils and cookware
Short Run Stamping
Short run metal stamping requires minimal upfront tooling expenses and can be an ideal solution for prototypes or small projects. After the blank is created, manufacturers use a combination of custom tooling components and die inserts to bend, punch or drill the part. The custom forming operations and smaller run size can result in a higher per-piece charge, but the absence of tooling costs can make short run more cost-efficient for many projects, especially those requiring fast turnaround.
Manufacturing Tools for Stamping
There are several steps in producing metal stamping. The first step is designing and manufacturing the actual tool used to create the product.
Let’s take a look at how this initial tool is created: Stock Strip Layout & Design: A designer uses is used to design the strip and determine dimensions, tolerances, feed direction, scrap minimization and more.
Tool Steel and Die Set Machining: CNC ensures a higher level of precision and repeatability for even the most complex dies. Equipment like 5-axis CNC mills and wire EDM machines can cut through hardened tool steels with extremely tight tolerances.
Secondary Processing: Heat treating is applied to metal parts to enhance their strength and make them more durable for their application. Grinding is used to finish parts requiring high surface quality and dimension accuracy.
Wire EDM: Wire electrical discharge machining shapes metal materials with an electrically-charged strand of brass wire. Wire EDM can cut the most intricate shapes, including small angles and contours.
Metal Stamping Design Processes
Metal stamping is a complex process that can include a number of metals forming processes —blanking, punching, bending, and piercing and more.
Blanking: This process is about cutting the rough outline or shape of the product. This stage is about minimizing and avoiding burrs, which can drive up the cost of your part and extend lead time. The step is where you determine hole diameter, geometry/taper, the spacing between edge-to-hole and insert the first piercing.

Bending: When you are designing the bends into your stamped metal part, it is important to allow for enough material — make sure to design your part and its blank so that there is enough material to perform the bend. Some important factors to remember:
- If a bend is made too close to the hole, it can become deformed.
- Notches and tabs, as well as slots, should be designed with widths that are at least 1.5x the thickness of the material. If made any smaller, they can be difficult to create due to the force exerted on punches, causing them to break.
- Every corner in your blank design should have a radius that is at least half of the material thickness.
- To minimize instances and severity of burrs, avoid sharp corners and complex cutouts when possible. When such factors cannot be avoided, be sure to note burr direction in your design so they can be taken into account during stamping
Coining: This action is when the edges of a stamped metal part are struck to flatten or break the burr; this can create a much smoother edge in the coined area of the part geometry; this can also add additional strength to localized areas of the part and this can be utilized to avoid secondary process like deburring and grinding. Some important factors to remember:
- Plasticity and grain direction
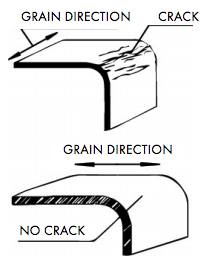
Plasticity is the measure of permanent deformation a material undergoes when subjected to force. Metals with more plasticity are easier to form. Grain direction is important in high strength materials, such as tempered metals and stainless steel. If a bend goes along the grain of a high strength, it can be prone to cracking.
- Bend height
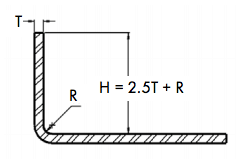
The overall height of a bend has minimum requirements to be formed effectively and should be at minimum, 2.5x the thickness of the material + the radius of the bend.
- Bend relief
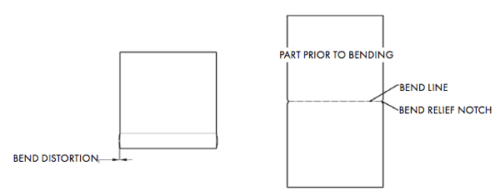
Add small notches located immediately adjacent to the portion of the part to be bent — they should be a minimum of twice as wide as the material is thick, and as long as the bend radius plus material thickness.

- Bend Distortion/Bulge
The bulging caused by bend distortion can be as large as ½ the material thickness. As material thickness increases and bend radius decreases the distortion/bulge becomes more severe.
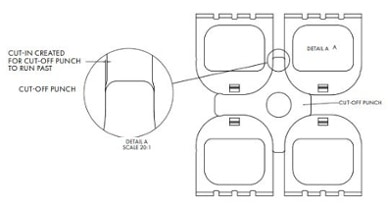
- Carrying Web and “Mismatch” Cut
This is when a very slight cut-in or bump-out on the part is required and is typically about .005” deep. This feature is not necessary when utilizing compound or transfer type tooling but is required when utilizing progressive die tooling.
